

Installing Mediawiki Is Much Easier Than The Instructions Suggest -- My Quick 10 Step Tutorial for Installing Mediawiki
 If you glance at the instructions for installing Mediawiki, it looks like you have to run complicated scripts with shell access to your server and other geeky stuff. In reality, it's about as easy to install as Dokuwiki -- assuming you have a typical hosted account, such as with Blue Host or Lunar Pages. Here's how to do it.
To install Mediawiki:
- The latest version of Mediawiki requires PHP5. If you don't already have PHP5 on your server, ask your Web host to move your account to a server with PHP 5. If you have cPanel, you may have a feature that says Enable/Disable PHP5. If so, you can enable PHP5 yourself.
- Download the latest version of Mediawiki. Currently the latest version is 1.15.1.
- Use a tool like 7-zip to unzip the compressed Mediawiki folder. Right-click the downloaded folder and select 7-zip > Extract. You may have to extract it a couple of times before you see the folder. Once extracted, upload the contents of the folder to a new directory on your server, probably at /wiki. For example, my practice wiki is at https://idratherbewriting.com/wiki.
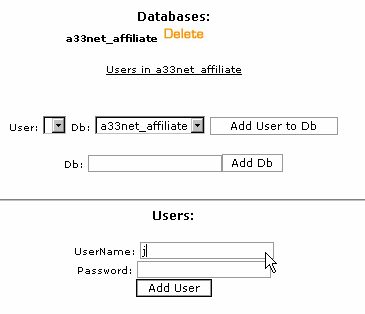
- Create a MySQL database with a username and password. This may seem hard because it's probably not something you do regularly, but it's really a one minute process if you have a MySQL feature in cPanel. You also need to add a user to the MySQL database that you create.Watch this video tutorial from LunarPages to see how this is done in cPanel—browse to Shared Hosting Tutorials > Working with cPanel > MySQL Database Management > Creating a MySQL Database. Write down the database name, the user you added, and the password.
- Run the Mediawiki installer by simply going to http://yourdomain.com/wiki (or wherever you installed the Mediawiki files). It should automatically bring up a configuration screen that requires a handful of field inputs (including the database information from the previous step) before telling you to click an installation link.
- Proceed through the installation wizard, entering the database information in the fields and selecting the options you want.
- After Mediawiki installs, you will be prompted to download the Localsettings.php file and upload it to the root directory. The Localsettings file is a key file that you add information to in order to customize your wiki. For example, no doubt you'll want to customize the logo area. Using a tool like Notepad++, add the following code (but change the path): $wgLogo = "http://stc-suncoast.org/wiki/stclogo.gif";. The http path is the path for your logo, so you should have an image file uploaded there. Don't forget the semicolon at the end of the statement.
- After Mediawiki installs, it shows you links to user guides. To customize your sidebar, search for Mediawiki:Sidebar (using the search box in your new wiki site). It will show you the page you need to modify.
Update Mediawiki
To upgrade Mediawiki, just download the latest Mediawiki files. Upload them to your root to overwrite the previous Mediawiki files. Then go to yoursitepath.com/mw-config. You'll be prompted to upgrade your wiki. As part of the upgrade process, you'll be asked to enter a key that you find your localsettings.php file.
About Tom Johnson

I'm an API technical writer based in the Seattle area. On this blog, I write about topics related to technical writing and communication — such as software documentation, API documentation, AI, information architecture, content strategy, writing processes, plain language, tech comm careers, and more. Check out my API documentation course if you're looking for more info about documenting APIs. Or see my posts on AI and AI course section for more on the latest in AI and tech comm.
If you're a technical writer and want to keep on top of the latest trends in the tech comm, be sure to subscribe to email updates below. You can also learn more about me or contact me. Finally, note that the opinions I express on my blog are my own points of view, not that of my employer.